|
|
|
|
|
|
Hello World Plugin-inThe JLense platform is structured as a core runtime engine and a set of additional features that are installed as platform plug-ins. Plug-ins contribute functionality to the platform by contributing to pre-defined extension points. The workbench UI is contributed by one such plug-in. When you start up the workbench, you are not starting up a single Java program. You are activating a platform runtime which can dynamically discover registered plug-ins and start them as needed. When you want to provide code that extends the platform, you do this by defining system extensions in your plug-in. The platform has a well-defined set of extension points - places where you can hook into the platform and contribute system behavior. From the platform's perspective, your plug-in is no different from basic plug-ins like the resource management system or the workbench itself. So how does your code become a plug-in?
Creating a plug-in is best demonstrated by implementing an old classic, "Hello World," as a plug-in. We'll gloss over some details at first in order to get it running. Then we'll look at extension points in more detail, see where they are defined, and learn how plug-ins describe their implementation of an extension. A minimal plug-inWe all know what "Hello World" looks like in plain old Java without using any user interface or other framework.
   public class HelloWorld {
      public static void main(String[] args) {
         System.out.println("Hello World");
      }
   }
What happens to this old standard in the context of the JLense platform? Instead of thinking of Hello World as a self-contained program, we recast it as an extension of the platform. Since we want to say hello to the world, we need to figure out how to extend the workbench to include our greeting. When we get deeper into the platform user interface components, we'll do an exhaustive review of the ways that you can extend and customize the workbench UI. For now, let's start with one of the simplest workbench extensions - a view. You can think of the workbench window as a frame that presents various views. Views provide information about some object that the user is working with in the workbench. Views often change their content as the user selects different objects in the workbench. Create the folders we need to get startedThe JLense platform installation is structured in the same way that a JLense application is structured except that the JLense platform comes with extra files and directories that contain source, build and testing artfacts that allow you to build JLense and its sample applications from scratch. The JLense platform comes with a simple command-line build system based on Ant. This example will walk you through the process of building our plugin using any text editor and the JLense build system. You can use any Java IDE you wish to build JLense plug-ins but the details of using any particular IDE are not covered here. (Note: the JLense platform comes with Eclipse project files in its root directory so it's trivial to load the JLense platform project into Eclipse and start working). There are three basic steps to creating a new plugin thats works well with JLense build system...
Well, that it! We hope that wasn't too bad :-). Now you're ready to rock. Hello world viewFor our hello world plug-in, we will implement our own view to greet the user with "Hello World." The package org.jlense.uiworks and its sub packages contain the public interfaces that define the workbench user interface (UI) API. Many of these interfaces have default implementation classes that you can extend to provide simple modifications to the system. In our hello world example, we will extend a workbench view to provide a label that says hello. The interface of interest is IViewPart, which defines the methods that must be implemented to contribute a view to the workbench. The class ViewPart provides a default implementation of this interface. In a nutshell, a view part is responsible for creating the components needed to show the view. The class OutlookPart provides a slightly fancier implementation of the IViewPart interface so we'll actually use this implementation class. Among other things, the names of OutlookParts are automagically added to the workbench title when those parts have the focus. The standard views in the workbench often display some information about an object that the user has selected or is navigating. Views update their contents based on actions that occur in the workbench. In our case, we are just saying hello, so our view is quite simple. Writing the codeNow we're ready to study some code. Here is everything you need in your HelloWorldView.
package org.jlense.examples.hello;

import javax.swing.JComponent;
import javax.swing.JLabel;
import javax.swing.JPanel;

import org.jlense.uiworks.part.OutlookPart;

public class HelloWorldView  extends OutlookPart
{
    public JComponent createPartControl()
    {
        return new JLabel("Hello World");
    }

}
The view part creates the widgets that will represent it in the createPartControl method. In this example, we create a label that displays the phrase "Hello World".
This is all we need!
We can now compile our class, and create our plugin jar file.
To compile, simply run this command from the root JLense directory:
Okay, so we've now build the org.jlense.examples plugin. How do we add this view to the workbench and run the code? The hello world plug-inWe need to inform the platform that we want to contribute our view. This is done by extending the org.jlense.uiworks.views extension point. We register our extension by providing a manifest file, plugin.xml, which describes our plug-in, including where its code is located, and the extension we are adding. This step has also already been done for you. A plugin.xml file has been created in the plugins/org.jlense.examples folder. Here are the contents of thst file:
<?xml version="1.0" encoding="UTF-8"?>
<plugin
   id="org.jlense.examples"
   name="JLense Examples"
   version="1.0.0"
   provider-name="jlense.org">

<requires>
   <import plugin="org.jlense.uiworks"/>
</requires>

<runtime>
   <library name="org.jlense.examples_1.0.0.jar"><export name="*"/></library>
</runtime>


<!-- add workbench views  -->
<extension point="org.jlense.uiworks.views">
	<view
		name="Hello World"
		class="org.jlense.examples.hello.HelloWorldView"
		id="org.jlense.examples.hello.HelloWorldView" />
</extension>

<!-- add workbench shortcuts to the views defined above  -->
<extension point="org.jlense.uiworks.perspectiveExtensions">
	<perspectiveExtension targetID="org.jlense.uiworks.OutlookPerspective">
		<viewShortcut id="org.jlense.examples.hello.HelloWorldView" />
	</perspectiveExtension>
</extension>

</plugin>
In this file, we define the name, id, and version for our plug-in. We also list our required plug-ins. Since we use the JLense workbench in our plug-in, we must list org.jlense.uiworks. We must also describe where our executable code is located. The code for our plugin is packaged in org.jlense.examples_1.0.0.jar, so we register that as our library name. We declare extensions that our plug-in is contributing. The org.jlense.uiworks.views extension has several different configuration parameters. We declare a unique id for our view and specify the name of the class that provides the implementation of the view. We also specify a name for the view, "Hello World" which will be shown in the view's title bar. Finally, we declare a shortcut to our view. Declaring a shortcut causes an icon to be added to the JLense shortcuts window that will show our view when clicked. Run the JLense WorkbenchWe're ready to run the workbench and take a look at our view!
To run the default JLense workbench run this command from the JLense root directory:
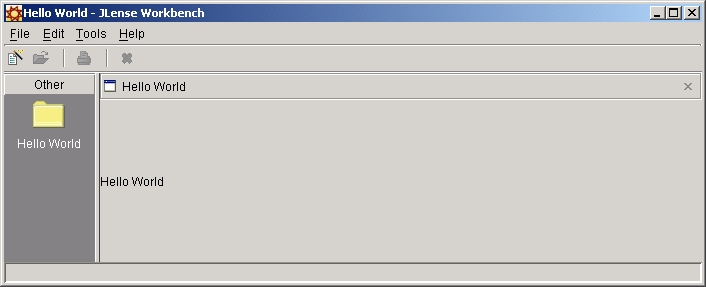
After the workbench starts click on the icon in the shortcuts window that say "Hello World" and the Hello World window will be displayed. The workbench should look something like this (the application was resized so that its image would fit in the documentation better):
Plug-in idsThere are many ids used in a plug-in manifest file. Individual extension points often define configuration parameters that require ids (such as the category id used above for the views extension point). We also define a plug-in id. In general, you should use Java package name prefixes for all of your ids in order to ensure uniqueness among all the installed plug-ins. The specific name that you use after the prefix is completely up to you. However, if your plug-in id prefix is exactly the same name as one of your packages, you should avoid using class names from that package. Otherwise it will become difficult to tell whether you are looking at an id name or a class name. You should also avoid using the same id for different extension configuration parameters. In the above manifest, we have used a common id prefix (org.jlense.examples.hello) but all of our ids are unique. This naming approach helps us to read the file and see which ids are related. |